Hexo魔改教程1
魔改前必看(最好认真看完🥗)
- 魔改前,先
准备好Butterfly的仓库备份,以免出现语法等一系列报错之后查看源代码进行回滚(重中之重) - Hexo小白谨慎魔改,在此之前,请通过
网上学习js、pug、css、styl等语言再进行魔改,以免报错后甩锅 - 本教程提到的需要的插件都为开源免费,如果插件从开源变成了闭源或者收费,请
告知作者删除关于闭源或者收费的插件教程 - 本教程插件来源于网上,轮子都是大佬造好的,再加上我自己的图片替换和稍加改造,具体以大佬的教程为主,本处仅做一个总结,
如有侵权请联系删除。 - 本帖涉及魔改源码的内容,会使用diff代码块标识,复制时请不要忘记删除前面的
+、-符号。 - 鉴于每个人的根目录名称都不一样,本帖博客根目录一律以
[BlogRoot]指代。 - 因为
.pug和.styl以及.yml等对缩进要求较为严格,请尽量不要使用记事本等无法提供语法高亮的文本编辑器进行修改。 - 本帖基于Butterfly主题进行魔改方案编写,因此请读者
优先掌握Butterfly主题官方文档的内容后再来进行魔改。 - 魔改会过程常常引入自定义的css与js文件,请自行上网查找如何在Butterfly引入css和js(太懒了不想自己写)
violet留言板(店长)
查看教程

在[Blogroot]运行命令安装插件
1 | npm install hexo-butterfly-envelope --save |
在站点配置文件
_config.yml或主题配置文件_config.butterfly.yml添加以下配置项1 | # envelope_comment |
文章置顶滚动栏(店长)
查看教程
安装插件,在博客根目录[Blogroot]下打开终端,运行以下指令:
1 | npm install hexo-butterfly-swiper --save |
在站点配置文件
_config.yml或者主题配置文件_config.butterfly.yml中添加1 | # hexo-butterfly-swiper |
要用的时候,在文章的front_matter中添加swiper_index配置项即可。
1 | --- |
自定义字体(自家用)
查看教程
声明:非商免字体未经授权仅限个人使用,不得用于商业用途!
这里以方正FW筑紫A圆D为例,这款字体无论是美观性,还是协调性都是很好的,很适合用来做网站全局字体
下载字体
在custom.css里添加代码(没有可自行于[Blogroot]\source\创建css文件夹,再创建custom.css)
说明:custom.css记得引入inject,具体上网查找,这里不多提及
2
3
4
5
6
7
8
9
10
11
12
/* 为载入的字体取名字(随意) */
font-family: 'FZFW ZhuZi A YuanS D';
/* 字体文件地址(相对或者绝对路径都可以) */
src: url(/font/FZFWZhuZiAYuanJWD.woff2);
/* 定义加粗样式(加粗多少) */
font-weight: normal;
/* 定义字体样式(斜体/非斜体) */
font-style: normal;
/* 定义显示样式 */
font-display: block;
}
在_config.butterfly.yml里添加如下代码(如已添加可自行修改)
2
3
4
5
global-font-size: 16px
code-font-size: 16px
font-family: FZFW ZhuZi A YuanS D, FZFW ZhuZi A YuansS D, "FZFW ZhuZi A YuanS D", "FZFW ZhuZi A YuanS D", Lato, Roboto, "FZFW ZhuZi A YuanS D", "FZFW ZhuZi A YuanS D", "FZFW ZhuZi A YuanS D", sans-serif
code-font-family: consolas, Menlo, "consolas", "FZFW ZhuZi A YuanS D", "FZFW ZhuZi A YuansS D", sans-serif
黑夜霓虹灯2.0(纯CSS实现)(Fomalhaut)
查看教程
这个就是在博客主页标题加上霓虹灯
在自定义的custom.css中添加如下代码,实现的原理就是关键帧线性插值,然后一直循环,这里默认是左上角标题、中间标题和副标题,还有文章页头的标题和信息有循环霓虹灯,菜单的文字实现起来要改一下源码,个人觉得没必要了,这样就够了,多了反而花里胡哨:
1 | /* 日间模式不生效 */ |
听话的鼠标(Fomalhaut)(不如叫点点鼠标)
查看教程
新建文件[BlogRoot]\source\js\cursor.js,在里面写上如下代码:
1 | var CURSOR; |
在
[BlogRoot]\source\css\custom.css添加如下代码:1 | /* 鼠标样式 */ |
引入iconfont自定义图标(店长)
查看教程
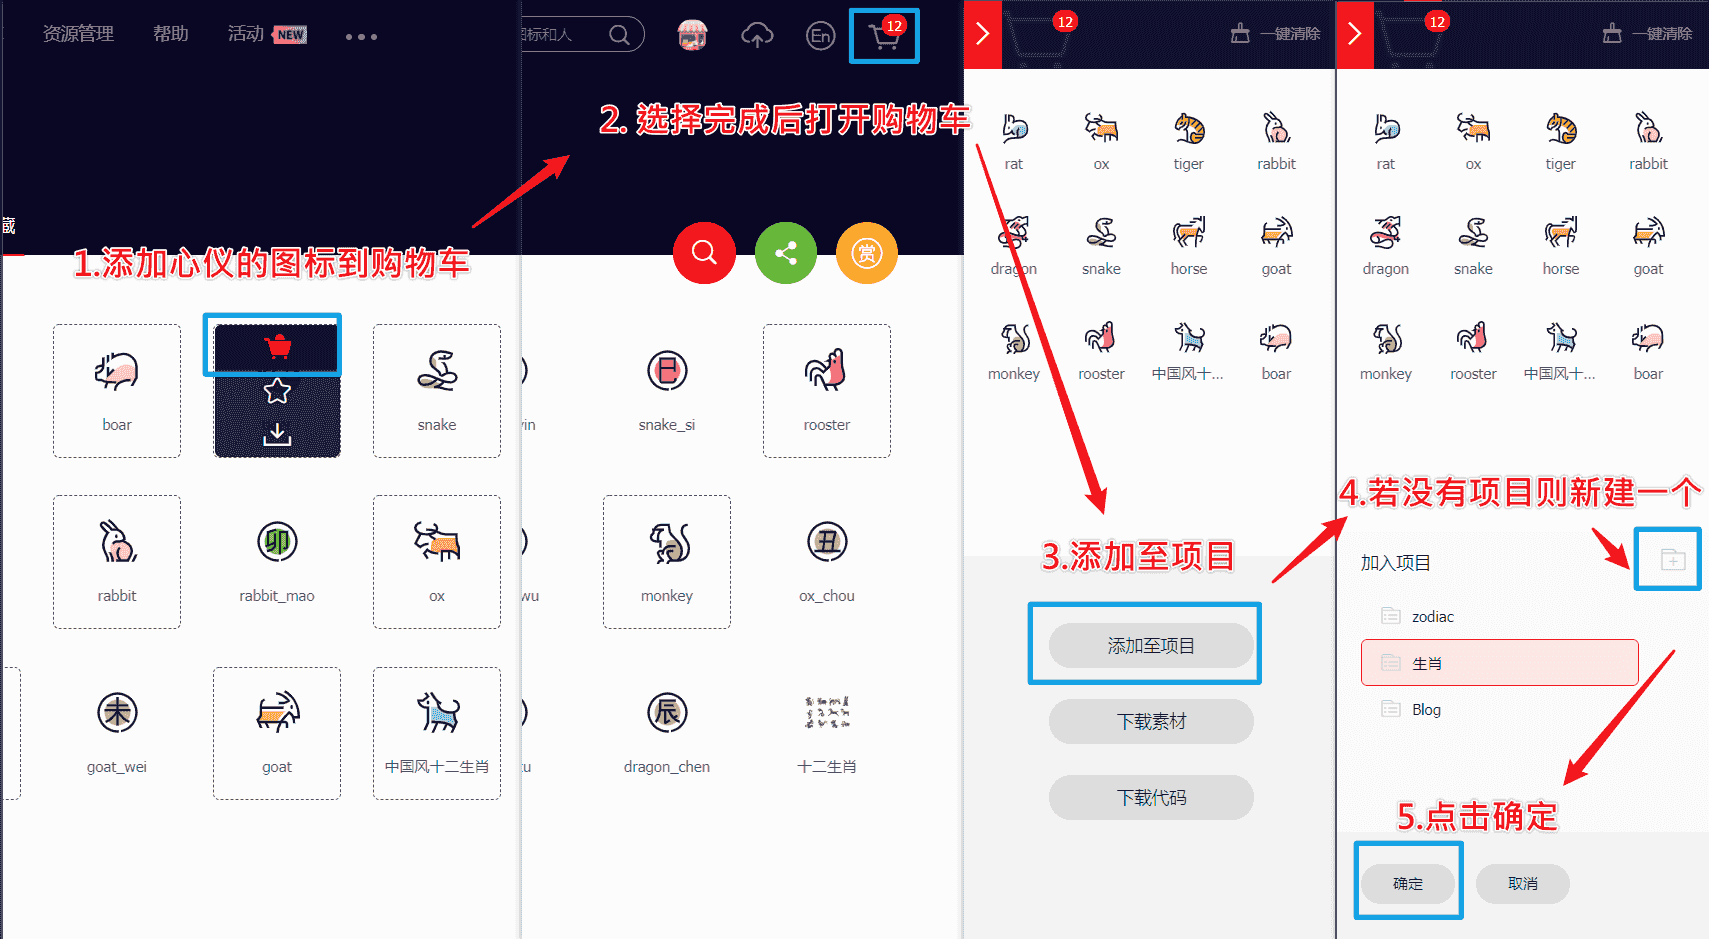
注册准备
- 访问阿里巴巴矢量图标库,注册登录。(要手机号)
- 搜索自己心仪的图标,然后选择添加入库,加到购物车。
- 选择完毕后点击右上角的购物车图标,打开侧栏,选择添加到项目,如果没有项目就新建一个。
引入使用
- 可以通过上方顶栏菜单->资源管理->我的项目,找到之前添加的图标项目。(现在的iconfont可以在图标库的项目设置里直接打开彩色设置,然后采用fontclass的引用方式即可使用多彩图标。但是单一项目彩色图标上限是40个图标,酌情采用。)
点击生成代码就可以创建Font class和Symbol文件,首先在custom.css中引入Font class文件然后将1
@import "//at.alicdn.com/t/font_2264842_b004iy0kk2b.css";
Font class和Symbol引入inject:同时在custom.css中添加如下样式来控制图标默认大小等属性(以彩色图标为例)1
2
3
4
5inject:
head:
- <link rel="stylesheet" href="//at.alicdn.com/t/font_2264842_b004iy0kk2b.css" media="defer" onload="this.media='all'">
bottom:
- <script async src="//at.alicdn.com/t/font_2264842_b004iy0kk2b.js"></script>1
2
3
4
5
6
7
8
9.iconfont {
font-family: "iconfont" ;
/* 这里可以自定义图标大小 */
font-size: 3em;
font-style: normal;
-webkit-font-smoothing: antialiased;
-moz-osx-font-smoothing: grayscale;
}
菜单栏多色动态图标(店长)
查看教程
在此之前,请确保引入了fontawesome_animation的前置依赖和你的iconfont的Fontclass(css文件)和symbol(js文件)
1 | inject: |
- 替换
[BlogRoot]\themes\butterfly\layout\includes\header\menu_item.pug为以下代码,本方案默认使用观感最佳的悬停父元素触发子元素动画效果,默认动画为faa-tada。注意:可以把之前的代码注释掉,再在后面加上如下代码,以便于回滚,此代码在butterfly4.13上可以运行并保留hide字段隐藏子菜单的功能,其他版本自行测试。代码的本质并不复杂,就是扫描配置文件对应的配置项,然后根据||的分割标志筛选出对应的图标名称、对应链接等,从而渲染出html页面。1
2
3
4
5
6
7
8
9
10
11
12
13
14
15
16
17
18
19
20
21
22
23
24
25
26
27
28
29
30
31
32
33
34
35
36
37
38
39
40
41
42
43
44
45
46if theme.menu
.menus_items
each value, label in theme.menu
if typeof value !== 'object'
.menus_item
- const valueArray = value.split('||')
a.site-page.faa-parent.animated-hover(href=url_for(trim(value.split('||')[0])))
if valueArray[1]
i.fa-fw(class=trim(valueArray[1]))
- var icon_value = trim(value.split('||')[1])
- var anima_value = value.split('||')[2] ? trim(value.split('||')[2]) : 'faa-tada'
if icon_value.substring(0,2)=="fa"
i.fa-fw(class=icon_value + ' ' + anima_value)
else if icon_value.substring(0,4)=="icon"
svg.icon(aria-hidden="true" class=anima_value)
use(xlink:href=`#`+ icon_value)
span=' '+label
else
.menus_item
- const labelArray = label.split('||')
- const hideClass = labelArray[3] && trim(labelArray[3]) === 'hide' ? 'hide' : ''
a.site-page.group.faa-parent.animated-hover(class=`${hideClass}` href='javascript:void(0);')
if labelArray[1]
- var icon_label = trim(label.split('||')[1])
- var anima_label = label.split('||')[2] ? trim(label.split('||')[2]) : 'faa-tada'
if icon_label.substring(0,2)=="fa"
i.fa-fw(class=icon_label + ' ' + anima_label)
else if icon_label.substring(0,4)=="icon"
svg.icon(aria-hidden="true" class=anima_label)
use(xlink:href=`#`+ icon_label)
span=' '+ trim(labelArray[0])
i.fas.fa-chevron-down
ul.menus_item_child
each val,lab in value
- const valArray = val.split('||')
li
a.site-page.child.faa-parent.animated-hover(href=url_for(trim(val.split('||')[0])))
if valArray[1]
- var icon_val = trim(val.split('||')[1])
- var anima_val = val.split('||')[2] ? trim(val.split('||')[2]) : 'faa-tada'
if icon_val.substring(0,2)=="fa"
i.fa-fw(class=icon_val + ' ' + anima_val)
else if icon_val.substring(0,4)=="icon"
svg.icon(aria-hidden="true" class=anima_val)
use(xlink:href=`#`+ icon_val)
span=' '+ lab - 以下是填写示例,在
[BlogRoot]\_config.butterfly.yml中修改。icon-xxx字样的为iconfont的symbol引入方案的id值,可以在你的iconfont图标库内查询,其中hide属性也是可以用的。1
2
3
4
5
6
7menu:
首页: / || icon-home || faa-tada
文章 || icon--article || faa-tada || hide:
归档: /archives/ || icon-guidang1 || faa-tada
标签: /tags/ || icon-sekuaibiaoqian || faa-tada
分类: /categories/ || icon-fenlei || faa-tada
随便逛逛: javascript:randomPost(); || icon-zuji1 || faa-tada - 要注意的是,这里的动态图标是
svg.icon的标签,因此上面调节.iconfont的css并不使用,我们需要在自定义样式文件custom.css里加上一些样式来限制图标的大小和颜色等,具体大小自行调节。1
2
3
4
5
6
7svg.icon {
width: 1.28em;
height: 1.28em;
vertical-align: -0.15em;
fill: currentColor;
overflow: hidden;
} - 重启项目即可看到效果:
1
hexo cl; hexo s
挂绳智慧の子(tzy大佬+微调)
查看教程
效果预览:
原教程是领走小猫咪(tzy大佬的网站崩了,原帖看不到了),这次直接用的是Fomal大佬的教程,原来的小猫咪图片没有崩,换成了我自己现在玩Minecraft的皮肤头像,目前在Littleskin获得了13个赞
准备头部图片
这里的头并不是我原来的皮肤,原来的长这样
改了之后让他长得中二一点,就变成了这样
头部的更改,可以使用mcskin软件,补上了前任skin编辑器的漏洞,将眼睛改的中二一点,就像这样:
准备好之后保存皮肤,打开这个网站—>选择你要截取的MC皮肤—>点击正面头像的图片—>下载好后上传到你的图床,没有的可以上传到其他人的图床
使用
- 制作一个盛放内容的盒子,在
[BlogRoot]/node_modules/hexo-theme-butterfly/layout/includes/head.pug(如果是git clone 安装在[BlogRoot]/themes/butterfly/layout/includes/head.pug)最后一行加入如下代码:1
#myscoll
- 在
[BlogRoot]/theme/butterfly/source/js文件夹下新建一个cat.js,将以下代码复制到文件中。1
2
3
4
5
6
7
8
9
10
11
12
13
14
15
16
17
18
19
20
21
22
23
24
25
26
27
28
29
30
31
32
33
34
35
36
37
38
39
40
41
42
43
44
45
46
47
48
49
50
51
52
53
54
55
56
57
58
59
60
61
62
63
64
65
66
67
68
69
70
71
72
73
74
75
76
77
78
79
80
81
82
83
84
85
86
87
88
89
90
91
92
93
94
95
96
97
98
99
100
101
102
103
104
105
106
107
108
109
110
111
112
113
114
115
116
117
118
119
120
121
122
123
124
125
126
127
128
129
130
131
132
133
134
135
136
137
138
139
140
141
142
143
144
145
146
147if (document.body.clientWidth > 992) {
function getBasicInfo() {
/* 窗口高度 */
var ViewH = $(window).height();
/* document高度 */
var DocH = $("body")[0].scrollHeight;
/* 滚动的高度 */
var ScrollTop = $(window).scrollTop();
/* 可滚动的高度 */
var S_V = DocH - ViewH;
var Band_H = ScrollTop / (DocH - ViewH) * 100;
return {
ViewH: ViewH,
DocH: DocH,
ScrollTop: ScrollTop,
Band_H: Band_H,
S_V: S_V
}
};
function show(basicInfo) {
if (basicInfo.ScrollTop > 0.001) {
$(".neko").css('display', 'block');
} else {
$(".neko").css('display', 'none');
}
}
(function ($) {
$.fn.nekoScroll = function (option) {
var defaultSetting = {
top: '-1',
scroWidth: 5 + 'px',
z_index: 9999,
zoom: 2.0,
borderRadius: 5 + 'px',
right: 80 + 'px',
// 这里可以换为你喜欢的图片,例如我就换为了MC头像,但是要抠图,
nekoImg: "https://pic.imgdb.cn/item/667f87b7d9c307b7e9f2dcb7.png",
hoverMsg: "亻尔女子",
color: "#000000",
during: 500,
blog_body: "body",
};
var setting = $.extend(defaultSetting, option);
var getThis = this.prop("className") !== "" ? "." + this.prop("className") : this.prop("id") !== "" ? "#" +
this.prop("id") : this.prop("nodeName");
if ($(".neko").length == 0) {
this.after("<div class=\"neko\" id=" + setting.nekoname + " data-msg=\"" + setting.hoverMsg + "\"></div>");
}
let basicInfo = getBasicInfo();
$(getThis)
.css({
'position': 'fixed',
'width': setting.scroWidth,
'top': setting.top,
'height': basicInfo.Band_H * setting.zoom * basicInfo.ViewH * 0.1 + 'px',
'z-index': setting.z_index,
'background-color': setting.bgcolor,
"border-radius": setting.borderRadius,
'right': setting.right,
'background-image': 'url(' + setting.scImg + ')',
'background-image': '-webkit-linear-gradient(45deg, rgba(255, 255, 255, 0.1) 25%, transparent 25%, transparent 50%, rgba(255, 255, 255, 0.1) 50%, rgba(255, 255, 255, 0.1) 75%, transparent 75%, transparent)', 'border-radius': '2em',
'background-size': 'contain'
});
$("#" + setting.nekoname)
.css({
'position': 'fixed',
'top': basicInfo.Band_H * setting.zoom * basicInfo.ViewH * 0.01 - 50 + 'px',
'z-index': setting.z_index * 10,
'right': setting.right,
'background-image': 'url(' + setting.nekoImg + ')',
});
show(getBasicInfo());
$(window)
.scroll(function () {
let basicInfo = getBasicInfo();
show(basicInfo);
$(getThis)
.css({
'position': 'fixed',
'width': setting.scroWidth,
'top': setting.top,
'height': basicInfo.Band_H * setting.zoom * basicInfo.ViewH * 0.01 + 'px',
'z-index': setting.z_index,
'background-color': setting.bgcolor,
"border-radius": setting.borderRadius,
'right': setting.right,
'background-image': 'url(' + setting.scImg + ')',
'background-image': '-webkit-linear-gradient(45deg, rgba(255, 255, 255, 0.1) 25%, transparent 25%, transparent 50%, rgba(255, 255, 255, 0.1) 50%, rgba(255, 255, 255, 0.1) 75%, transparent 75%, transparent)', 'border-radius': '2em',
'background-size': 'contain'
});
$("#" + setting.nekoname)
.css({
'position': 'fixed',
'top': basicInfo.Band_H * setting.zoom * basicInfo.ViewH * 0.01 - 50 + 'px',
'z-index': setting.z_index * 10,
'right': setting.right,
'background-image': 'url(' + setting.nekoImg + ')',
});
if (basicInfo.ScrollTop == basicInfo.S_V) {
$("#" + setting.nekoname)
.addClass("showMsg")
} else {
$("#" + setting.nekoname)
.removeClass("showMsg");
$("#" + setting.nekoname)
.attr("data-msg", setting.hoverMsg);
}
});
this.click(function (e) {
btf.scrollToDest(0, 500)
});
$("#" + setting.nekoname)
.click(function () {
btf.scrollToDest(0, 500)
});
return this;
}
})(jQuery);
$(document).ready(function () {
//部分自定义
$("#myscoll").nekoScroll({
bgcolor: 'rgb(0 0 0 / .5)', //背景颜色,没有绳子背景图片时有效
borderRadius: '2em',
zoom: 0.9
}
);
//自定义(去掉以下注释,并注释掉其他的查看效果)
/*
$("#myscoll").nekoScroll({
nekoname:'neko1', //nekoname,相当于id
nekoImg:'img/猫咪.png', //neko的背景图片
scImg:"img/绳1.png", //绳子的背景图片
bgcolor:'#1e90ff', //背景颜色,没有绳子背景图片时有效
zoom:0.9, //绳子长度的缩放值
hoverMsg:'你好~喵', //鼠标浮动到neko上方的对话框信息
right:'100px', //距离页面右边的距离
fontFamily:'楷体', //对话框字体
fontSize:'14px', //对话框字体的大小
color:'#1e90ff', //对话框字体颜色
scroWidth:'8px', //绳子的宽度
z_index:100, //不用解释了吧
during:1200, //从顶部到底部滑动的时长
});
*/
})
} - 在
[BlogRoot]/theme/butterfly/source/css文件夹下新建一个cat.css,将以下代码复制到文件中。当然你也可以选择不新建css文件,复制代码到custom.css也行,总之有地方引入就行。1
2
3
4
5
6
7
8
9
10
11
12
13
14
15
16
17
18
19
20
21
22
23
24
25
26
27
28
29
30
31
32
33
34
35
36
37
38
39
40
41
42
43
44
45
46
47
48
49
50
51
52
53
54
55
56
57
58
59
60
61
62
63
64
65
66
67
68
69
70
71
72
73
74
75
76
77
78
body::-webkit-scrollbar {
width: 0;
}
.neko {
width: 74px;
height: 74px;
background-image: url("https://pic.imgdb.cn/item/667f87b7d9c307b7e9f2dcb7.png");/*这个是MC头像*/
position: absolute;
right: 32px;
background-repeat: no-repeat;
background-size: contain;
transform: translateX(50%);
cursor: pointer;
font-family: tzy;
font-weight: 600;
font-size: 16px;
color: #6f42c1;
display: none;
}
.neko::after {
display: none;
width: 100px;
height: 100px;
background-image: url("https://bu.dusays.com/2022/07/20/62d812d95e6f5.png");/*这个是对话气泡,可以不该*/
background-size: contain;
z-index: 9999;
position: absolute;
right: 50%;
text-align: center;
line-height: 100px;
top: -115%;
}
.neko.showMsg::after {
content: attr(data-msg);
display: block;
overflow: hidden;
text-overflow: ellipsis;
}
.neko:hover::after {
content: attr(data-msg);
display: block;
overflow: hidden;
text-overflow: ellipsis;
}
.neko.fontColor::after {
color: #333;
}
/**
* @description: 滚动条样式 跟猫二选一
*/
@media screen and (max-width:992px) {
::-webkit-scrollbar {
width: 8px ;
height: 8px
}
::-webkit-scrollbar-track {
border-radius: 2em;
}
::-webkit-scrollbar-thumb {
background-color: rgb(255 255 255 / .3);
background-image: -webkit-linear-gradient(45deg, rgba(255, 255, 255, 0.1) 25%, transparent 25%, transparent 50%, rgba(255, 255, 255, 0.1) 50%, rgba(255, 255, 255, 0.1) 75%, transparent 75%, transparent);
border-radius: 2em
}
::-webkit-scrollbar-corner {
background-color: transparent
}
} - 在主题配置文件
_config.butterfly.yml中引入cat.js和cat.css,当然还有在bottom的最前面引入jQuery,因为cat.js的语法依赖jQuery。1
2
3
4
5
6inject:
head:
- <link rel="stylesheet" href="/css/cat.css">
bottom:
- <script defer src="https://npm.elemecdn.com/jquery@latest/dist/jquery.min.js"></script>
- <script defer data-pjax src="/js/cat.js"></script> - 最后重新编译运行即可看见效果。
1
hexo cl; hexo s
个人信息卡片彩色社交图标引入(店长)
查看教程
- 重写
[BlogRoot]\themes\butterfly\layout\includes\header\social.pug,替换为以下代码:1
2
3
4
5
6
7
8
9
10each value, title in theme.social
a.social-icon.faa-parent.animated-hover(href=url_for(trim(value.split('||')[0])) target="_blank" title=title === undefined ? '' : trim(title))
if value.split('||')[1]
- var icon_value = trim(value.split('||')[1])
- var anima_value = value.split('||')[2] ? trim(value.split('||')[2]) : 'faa-tada'
if icon_value.substring(0,2)=="fa"
i.fa-fw(class=icon_value + ' ' + anima_value)
else if icon_value.substring(0,4)=="icon"
svg.icon(aria-hidden="true" class=anima_value)
use(xlink:href=`#`+ icon_value) - 以下为对应的
social配置项。写法沿用menu_item的写法示例,修改[BlogRoot]\_config.butterfly.yml的social配置项,具体的链接改为自己的。1
2
3
4
5
6social:
微信: /assets/QRCode.jpg || icon-weixin || faa-tada
QQ: https://res.abeim.cn/api/qq/?qq=1174008660 || icon-QQ || faa-tada
B站: https://space.bilibili.com/220757832 || icon-bilibili || faa-tada
QQ邮箱: mailto:1174008660@qq.com || icon-youxiang || faa-tada
力扣: https://leetcode.cn/u/fomalhaut1998 || icon-leetcode || faa-tada - 要注意的是,这里的动态图标是
svg.icon的标签,因此上面调节.iconfont的css并不使用,我们需要在自定义样式文件custom.css里加上一些样式来限制图标的大小和颜色等,具体大小自行调节(如果上面弄过菜单栏的图标大小,这里也就不需要再重复写了)。1
2
3
4
5
6
7svg.icon {
width: 1.28em;
height: 1.28em;
vertical-align: -0.15em;
fill: currentColor;
overflow: hidden;
}
顶部渐变加载条
查看教程
- 在
[BlogRoot]\source\css\custom.css加入以下代码1
2
3
4
5
6
7
8
9
10
11
12
13
14
15
16
17
18
19
20
21
22
23
24
25
26
27
28
29
30
31
32
33
34
35
36
37
38
39
40
41
42
43
44
45
46
47
48
49
50
51
52
53
54
55
56.pace {
-webkit-pointer-events: none;
pointer-events: none;
-webkit-user-select: none;
-moz-user-select: none;
user-select: none;
z-index: 2000;
position: fixed;
margin: auto;
top: 4px;
left: 0;
right: 0;
height: 8px;
border-radius: 8px;
width: 7rem;
background: #eaecf2;
border: 1px #e3e8f7;
overflow: hidden
}
.pace-inactive .pace-progress {
opacity: 0;
transition: .3s ease-in
}
.pace .pace-progress {
-webkit-box-sizing: border-box;
-moz-box-sizing: border-box;
-ms-box-sizing: border-box;
-o-box-sizing: border-box;
box-sizing: border-box;
-webkit-transform: translate3d(0, 0, 0);
-moz-transform: translate3d(0, 0, 0);
-ms-transform: translate3d(0, 0, 0);
-o-transform: translate3d(0, 0, 0);
transform: translate3d(0, 0, 0);
max-width: 200px;
position: absolute;
z-index: 2000;
display: block;
top: 0;
right: 100%;
height: 100%;
width: 100%;
/* linear-gradient(to right, #3494e6, #ec6ead) */
background: linear-gradient(to right, #43cea2, #3866ca);
animation: gradient 2s ease infinite;
background-size: 200%
}
.pace.pace-inactive {
opacity: 0;
transition: .3s;
top: -8px
} - 在主题配置文件_config.butterfly.yml的inject配置项加入刚刚的css样式和必须的js依赖:
1
2
3
bottom:
- xxx
- <script async src="//npm.elemecdn.com/pace-js@1.2.4/pace.min.js"></script>


![[杂记]一个月过去了,我身边发生的事](https://i.p-i.vip/68/20251012-68eb6b78dff16.webp)
![[小记]在VMware上安装Debian13](https://s1.loveloli.me/hi168-27201-2582wulz/2026/04/11/20260411090945444.webp)
